Windows Activation

Ed Bott is digging into the technology behind Windows Activation, and one of the more amusing bits was when he had to use a cracking program to fix a file he had intentionally damaged since Microsoft’s own tool was unable to fix it.  My own amusing story was when I was trying to properly activate our work systems.  Since the volume management auto-registration program (KMS) won’t run until at least 25 Windows 7 systems have tried to register (why? I’ve no idea), I decided to fall back on our key (MAK) that we can use alternatively in limited use.  The key had worked for me fine before when I used the GUI, but when I used the command line ‘slmgr.vbs’ Windows still showed as being un-activated.  I wanted to use the command line so that I wouldn’t have to visit each system to register them, so I tried to force it on my own computer by using the undocumented ‘rearm’ switch.  I figured it would either work, or reset to default settings at which point I could try putting the key back in, but no, I got this instead:

Capture‘Unauthorized’?  By who?

It goes without saying that the OS in fact does NOT have to be reinstalled, but instead the licensing cache has to be cleared out (it also turns out that an extra command is required to register through the command line).  If Microsoft is going to be a bit overbearing in preventing piracy, couldn’t they at least make sure their anti-piracy protections work?  It aggravates me all the more since I’ve always made sure we are properly licensed and I would think that somewhere in the bucket of money we send them every year they could find the funds to fix stuff like this.

Sykes and AT&T

Our AT&T sales rep got us a pretty good deal on a new MPLS implementation, but the install left a lot to be desired.  Our previous MPLS install was handled by DPSciences and they did a great job of making sure all the technical aspects were handled and of making sure all the billing issues that accompany such an install were handled as well.  However, for the new implementation AT&T used Sykes and they did a wretched job of managing the install:

  • We weren’t given proper ETAs for installs.  This resulted in the install at one site being done improperly and the install at a different site not being scheduled at all.  This the led to a sticky billing issue where we were billed for circuits that were ready to be turned up, but couldn’t be utilized until the last circuit was brought up.
  • I asked the Sykes tech if our Class of Service was brought over.  The lack of response should have told me that something was up and it turned out that it wasn’t applied at all by their incompetent tech.  The lack of response didn’t register any higher in my mind since their tech never responded to me about anything.
  • They didn’t bring over an important custom configuration for one of our routers as I nagged them to do.  How hard is it to save a router configuration and then apply it to a different router that’s the same make and model?!?
  • It took a week of incessant nagging on my part in trying to figure out what was wrong with our new MPLS implementation before they eventually got back to me to let me know that there were routing errors only because one of our old MPLS routers was left on.  Yes, I guess I should have known, but would it have killed them to let me know that couple days sooner?

As a side note, we had an AT&T MIS Internet circuit put in by ACS and they did a great job as well.  There are plenty of other great AT&T outsource choices besides the apparently awful Sykes.

(UPDATE 3/3/11: Since so many users from AT&T have apparently taken an interest in this post I figured I would elaborate on the one aspect of the situation.  On our original MPLS implementation, which had chronic maintenance issues, we had a class of service configuration to accommodate primarily voice traffic, and secondarily Outlook and RDP/ICA traffic.  Despite e-mails and phone calls, Sykes decided not to bring this over and they closed out the install, meaning that I had to go through (several) change procedures before it was operating properly).

SSL on the Nortel BCM

All of these concepts are probably familiar to those in the know, but I wasn’t able to put the pieces together until I upgraded to Windows 7 and found that without a properly working SSL configuration Windows 7 wasn’t going to load up the BCM system administration utility.

The documentation for the Nortel BCM states to go to the ‘Maintenance’ section, and then ‘Maintenance Tools’ (well it doesn’t say that but I found it anyway), and then ‘Upload a Certificate and Private Key’.  However, where do I get these?  I knew that the certification would come from my Windows based CA that runs in the domain, but there wasn’t a tool to generate a certificate request on the BCM.  My clue was that a private key, the key used to generate the request, had to be uploaded as well.  I then used the version of openssl on the BCM to do the work, though in hindsight it probably would have been easier to use a newer version installed elsewhere. 

First, upon doing a version check of openssl I noticed that the working directory that it was looking for (‘c:\openssl\ssl’) didn’t exist.  I manually created the directory and did the work from there.  Eventually I discovered that the ‘openssl.cnf’ file (that was called something else and buried elsewhere on a different drive) that shipped with the BCM was lacking and I ended up brewing my own with the following settings:

[ req ]
default_bits        = 2048
default_keyfile         = privkey.pem
encrypt_rsa_key        = no
default_md        = sha1
distinguished_name        = req_distinguished_name
x509_extensions         = root_ca_extensions

[ req_distinguished_name ]
0.organizationName = Organization Name (company)
organizationalUnitName = Organizational Unit Name (department, division)
emailAddress = Email Address
emailAddress_max = 40
localityName = Locality Name (city, district)
stateOrProvinceName = State or Province Name (full name)
countryName = Country Name (2 letter code)
countryName_min = 2
countryName_max = 2
commonName = Common Name (hostname, IP, or your name)
commonName_max = 64

[ root_ca_extensions ]
basicConstraints        = CA:true

I then executed a command along the lines of the following and filling out the ‘form’ that comes up:

openssl req -new -newkey rsa:1024 -nodes -keyout bcmkey.pem -out bcmreq.pem

I then FTP’d (bad form, but I already said that a different method would have been better) the two files up to my file server.  I put the ‘req’ file through my Windows CA (‘Base 64 encoded’, and unlike the HP ILO card I didn’t need the whole chain) to get the web server certificate and I then uploaded them both up the BCM and viola, the SSL warning error messages were gone and the manager was happy under Windows 7.

Let Down a Little by 7

Although my limited Windows 7 experience thus far has been largely positive, even my meager deployment of a half dozen PCs has turned up two irritations:

  • Firstly, I started up four of the HP systems we purchased and two of the systems started in a different manner than the other two.  The ‘different’ systems had startup menu options that appeared out of sync.  It still got the job done, but it was disconcerting that even such a limited number of Windows PCs couldn’t be bothered to start up in a consistent manner (“did someone use this before me?”).
  • Secondly, my user base is pretty anxious for their new PCs so I was hoping to avoid a time sink by simply upgrading Windows 7 Pro (the OEM version which ships on the units) to Windows 7 Enterprise (the SA version we’re entitled to run).  Doing this would save me time from having to rebuild the application and driver base to support the system.  Unfortunately I got a big old error message stating that ‘Windows 7 Pro cannot be upgraded to Windows 7 Enterprise’.  Why the frick not?  Is it that involved of a process to copy that small handful of code that differentiates the versions?  It can upgrade from Vista Business, why not 7?

My only other peeve is the nasty mess that is the control panel.  I figured this would be one of the big things addressed with the upgrade, but that half baked idea is a direct port of the original Vista implementation.  I wait with baited breath in anticipation of finding another landmine.

Carriage Belt Replacement in the DesignJet 450C

These points are based off of the instructions posted here. I did not write that procedure and do not claim to be any sort of expert on DesignJet repair (which will be apparent in a moment). I also got the HP service manual from here (should be a PDF link).

Many years ago I started into the IT business as a hardware repair tech. Part of the duties of this position included repairing HP LaserJet II and III (yes, that long ago) so I wasn’t afraid to tackle this repair job. However, I should note that once I got the 450C halfway disassembled I realized that I didn’t have a ‘spare’ waiting for me at the office if I goofed up along the way so there wasn’t any margin for error. I will note now that these are expensive machines (unlike the now nearly disposable laser printers) and if you feel uncomfortable repairing it you’ll be better off calling someone in!

Anyway, I depend on the printer I am repairing for network diagrams, but unfortunately the plotter doesn’t fall under the purview of the same cost center that employs me so I couldn’t command anybody to have it repaired. If the cost center in question wanted to leave it unrepaired for years that was entirely up to them. At this moment however I am working on some rather involved network architecture plans and really needed the DesignJet to be up, so I took it upon myself to fix it.

As a note, as I discovered later that our DesignJet 450C is the ‘E’ sized version which uses a belt with part number C4706-60082. I had initially ordered the ‘D’ sized belt by mistake (part number C4705-60082). I acquired my new belt from our sales rep Judy Nerone over at Microage.

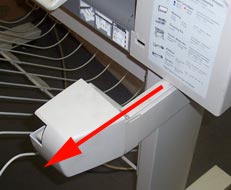
Before beginning work I unplugged the data and power cables:

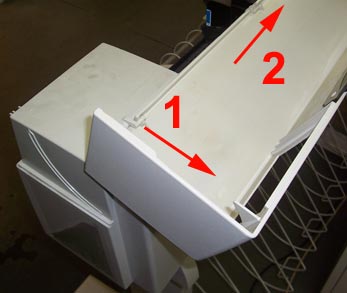
Next I removed the cover by first popping out the right most tab and sliding the cover to the left in order to clear the other tabs:

(Old plastic alert: these are old systems and the plastics, which were of the brittle variety to begin with, are very prone to breaking. Be as careful as you can (most of the steps that involve plastics usually require some decent force) and have some strong glue on hand).

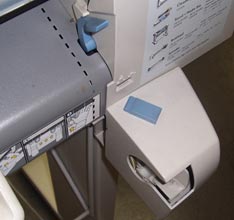
Remove the power button.

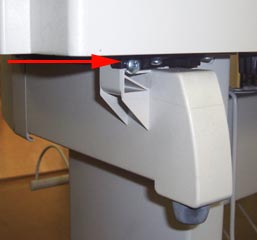
Remove the roll feed supports (if necessary) by removing the single torx 20 screw from both sides and sliding the arms out.

(Note: I had to go down to Home Depot to pick up the torx 20. Ido havea torx 15 leftover from my Compaq days).

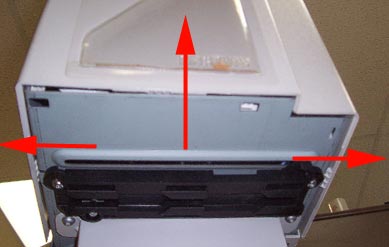
Remove the right cover gently as the control panel is attached to it (the left one is less of worry and comes off the same way). I really had to force the front tab but I was able to remove it without any tools.

The procedure I am referencing says to remove the control panel and leave the cable attached, however I opted to lift up the retaining tab on the control panel cable and disconnect it from the unit. The reason being that I wanted to minimize the cables contact with the sharp medal of the frame. If you do it like this, when reassembling the plotter make sure to reattach the cable before reattaching the spittoon since that will maximize the working area.

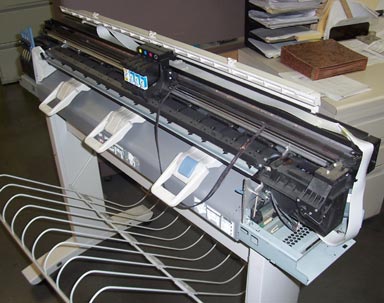
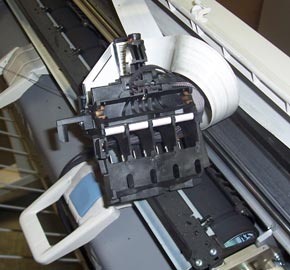
What it looks like so far. Note the poor condition of the belt which was obviously suffering from some severe dry rot. In this picture I’ve also loosened the white trailing ribbon from some it’s clips.

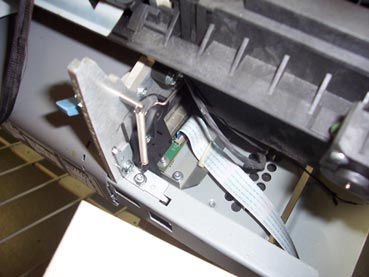
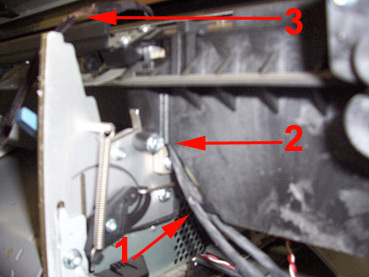
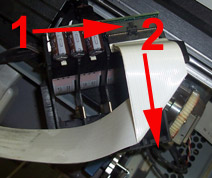
Next we have to remove the spittoon. Note the cables attached to the spittoon (#1). The screw which mounts the spitton to the frame is #2. #3 shows the cutter, when reattaching the spittoon make sure the cutter is in the same place.

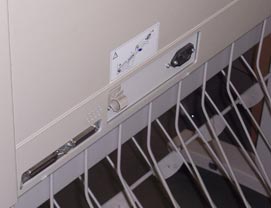
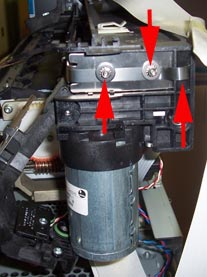
Next remove the encoder strip. Take special care with this part as it tells the carriage assembly where it is at. There are two (I believe 1/4″) nuts on the right (pictured) and a torx screw on the left. Both mounting locations feature holes stamped through delicate medal. Although it did not happen to me (fortunately), I can see where it would be real easy to rip this; on the right side especially. After undoing the nuts on the right, push (hard) on the front part of the medal bracket that it is mounted to(to the left) and there should be enough slack in the strip to disconnect it. Note the third arrow on the right, take special note of how the end of the strip is supposed to mount when reassembling. I’ll also point out that I’ve removed the trailing white data ribbon from its clips and put it around the back right corner of the plotter.

The bracket that held the encoding strip on the right side is then removed by removing one torx screw.

The cutting arm is then removed.

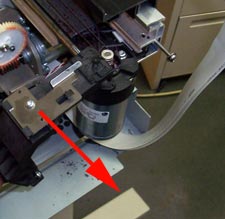
After removing the inks(and taping paper over the heads) I then removed the carriage assembly. At this point the defective belt can be removed from the carriage assembly

Although not required, I found the trailing ribbon cable much easier to disconnect from the carriage assembly after removing it off the rails. I was only able to do this because the belt was so shredded that it wasn’t even connected to the pulley or motor; otherwise you’d want to disconnect it from the carriage assembly before removing the carriage assembly to remove the belt. (I’ll note as well that I cleaned ink off of everything).

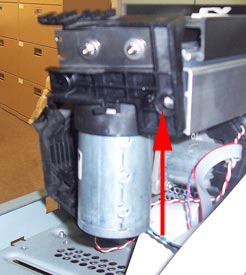
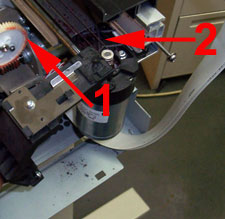
To remove the belt push the motor (#1, on the right side) in towards the left. Where #2 is you should see the spring you’ll be pushing in against.

At this point the printer is disassembled as far as it’s going to go and the new belt just has to be added (put on carriage assembly, then pulley, then motor) and the unit reassembled. Note though that I had to air hose out the unit since it was covered with shredded belt, and I had to scrape ink out the belt grooves on the motor and (especially) the pulley. In fact I had to remove the pulley on the left side (sorry, no pics) by pushing on a release clip that is beneath it under the frame. The pulley assembly consists of the wheel, axle, and a washer.

(Update 2/9/2016: I forgot to mention that this article is old enough that I actually had this happen to me again.  I have some nicer photos that I keep meaning to post; it’s on the list.  I figured I’d also mention that I have to keep an old 32bit server around since it is the only one with the original HP driver that lets me compile the job in memory on the PC, since even at it’s max, the printer memory cannot handle a lot of jobs.  I’m still surprised that this gets as much traffic as it does since so many moderately newer plotters can be had for cheap on EBay, if you’re fortunate enough to be near someone who is selling one).