Carriage Belt Replacement in the DesignJet 450C

These points are based off of the instructions posted here. I did not write that procedure and do not claim to be any sort of expert on DesignJet repair (which will be apparent in a moment). I also got the HP service manual from here (should be a PDF link).

Many years ago I started into the IT business as a hardware repair tech. Part of the duties of this position included repairing HP LaserJet II and III (yes, that long ago) so I wasn’t afraid to tackle this repair job. However, I should note that once I got the 450C halfway disassembled I realized that I didn’t have a ‘spare’ waiting for me at the office if I goofed up along the way so there wasn’t any margin for error. I will note now that these are expensive machines (unlike the now nearly disposable laser printers) and if you feel uncomfortable repairing it you’ll be better off calling someone in!

Anyway, I depend on the printer I am repairing for network diagrams, but unfortunately the plotter doesn’t fall under the purview of the same cost center that employs me so I couldn’t command anybody to have it repaired. If the cost center in question wanted to leave it unrepaired for years that was entirely up to them. At this moment however I am working on some rather involved network architecture plans and really needed the DesignJet to be up, so I took it upon myself to fix it.

As a note, as I discovered later that our DesignJet 450C is the ‘E’ sized version which uses a belt with part number C4706-60082. I had initially ordered the ‘D’ sized belt by mistake (part number C4705-60082). I acquired my new belt from our sales rep Judy Nerone over at Microage.

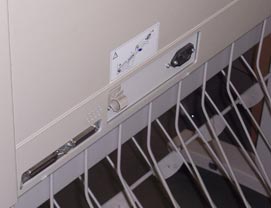
Before beginning work I unplugged the data and power cables:
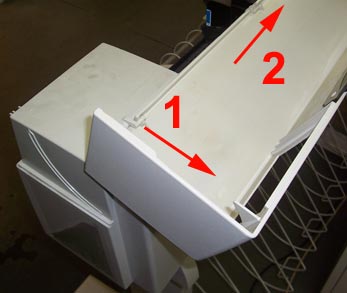
Next I removed the cover by first popping out the right most tab and sliding the cover to the left in order to clear the other tabs:

(Old plastic alert: these are old systems and the plastics, which were of the brittle variety to begin with, are very prone to breaking. Be as careful as you can (most of the steps that involve plastics usually require some decent force) and have some strong glue on hand).
Remove the power button.
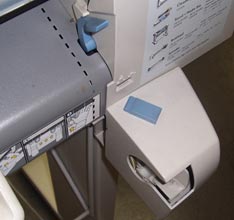
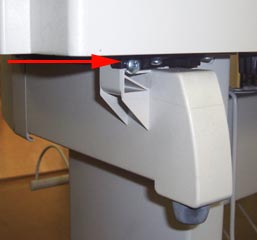
Remove the roll feed supports (if necessary) by removing the single torx 20 screw from both sides and sliding the arms out.

(Note: I had to go down to Home Depot to pick up the torx 20. Ido havea torx 15 leftover from my Compaq days).
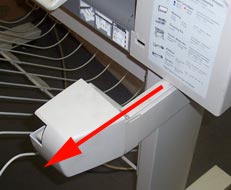
Remove the right cover gently as the control panel is attached to it (the left one is less of worry and comes off the same way). I really had to force the front tab but I was able to remove it without any tools.
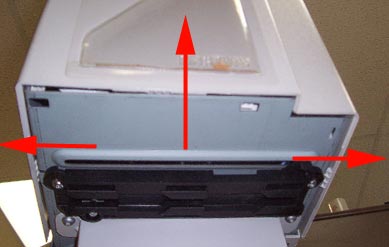
The procedure I am referencing says to remove the control panel and leave the cable attached, however I opted to lift up the retaining tab on the control panel cable and disconnect it from the unit. The reason being that I wanted to minimize the cables contact with the sharp medal of the frame. If you do it like this, when reassembling the plotter make sure to reattach the cable before reattaching the spittoon since that will maximize the working area.
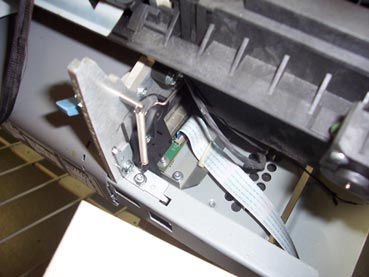
What it looks like so far. Note the poor condition of the belt which was obviously suffering from some severe dry rot. In this picture I’ve also loosened the white trailing ribbon from some it’s clips.
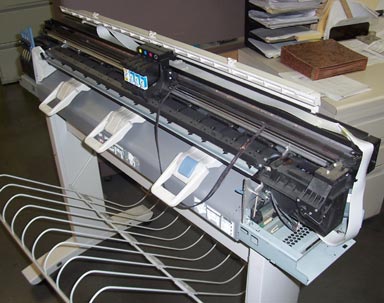
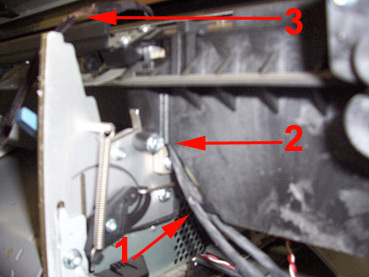
Next we have to remove the spittoon. Note the cables attached to the spittoon (#1). The screw which mounts the spitton to the frame is #2. #3 shows the cutter, when reattaching the spittoon make sure the cutter is in the same place.
Next remove the encoder strip. Take special care with this part as it tells the carriage assembly where it is at. There are two (I believe 1/4″) nuts on the right (pictured) and a torx screw on the left. Both mounting locations feature holes stamped through delicate medal. Although it did not happen to me (fortunately), I can see where it would be real easy to rip this; on the right side especially. After undoing the nuts on the right, push (hard) on the front part of the medal bracket that it is mounted to(to the left) and there should be enough slack in the strip to disconnect it. Note the third arrow on the right, take special note of how the end of the strip is supposed to mount when reassembling. I’ll also point out that I’ve removed the trailing white data ribbon from its clips and put it around the back right corner of the plotter.
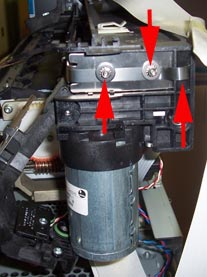
The bracket that held the encoding strip on the right side is then removed by removing one torx screw.
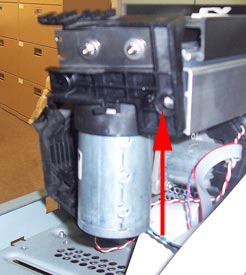
The cutting arm is then removed.
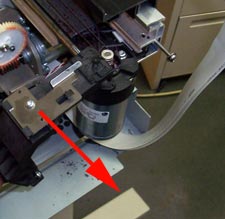
After removing the inks(and taping paper over the heads) I then removed the carriage assembly. At this point the defective belt can be removed from the carriage assembly
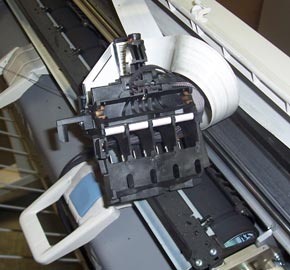
Although not required, I found the trailing ribbon cable much easier to disconnect from the carriage assembly after removing it off the rails. I was only able to do this because the belt was so shredded that it wasn’t even connected to the pulley or motor; otherwise you’d want to disconnect it from the carriage assembly before removing the carriage assembly to remove the belt. (I’ll note as well that I cleaned ink off of everything).
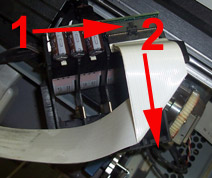
To remove the belt push the motor (#1, on the right side) in towards the left. Where #2 is you should see the spring you’ll be pushing in against.
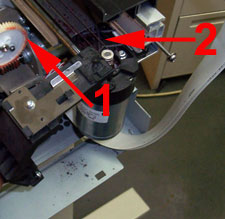
At this point the printer is disassembled as far as it’s going to go and the new belt just has to be added (put on carriage assembly, then pulley, then motor) and the unit reassembled. Note though that I had to air hose out the unit since it was covered with shredded belt, and I had to scrape ink out the belt grooves on the motor and (especially) the pulley. In fact I had to remove the pulley on the left side (sorry, no pics) by pushing on a release clip that is beneath it under the frame. The pulley assembly consists of the wheel, axle, and a washer.

(Update 2/9/2016: I forgot to mention that this article is old enough that I actually had this happen to me again.  I have some nicer photos that I keep meaning to post; it’s on the list.  I figured I’d also mention that I have to keep an old 32bit server around since it is the only one with the original HP driver that lets me compile the job in memory on the PC, since even at it’s max, the printer memory cannot handle a lot of jobs.  I’m still surprised that this gets as much traffic as it does since so many moderately newer plotters can be had for cheap on EBay, if you’re fortunate enough to be near someone who is selling one).

Obscure IIS 7 Issue

On my WSUS implementations on my Windows 2008 servers I’ve an issue on two occasions where clients become unable to download the wuident.cab file.  Attempting to manually download the file results in a “403-Forbidden: Access is denied” error.  The first time I was getting the error I had an update to the Windows Update Service that I had been putting off, and after installing it the error cleared up.  The second time it came up only one of my update servers had the issue and I was befuddled as (just like the first time) the server was working fine and then began getting the issue seemingly out of the blue (more than likely due to an update of some sort?  The DPM install on the same server?).  One caveat though was that it all worked fine locally.

After hunting through the GUI and checking permissions I finally tracked down this web link.  For some reason the ‘<location path=”Default Web Site/SimpleAuthWebService”>’ section of the applicationhost.config file was getting set to all the ‘NoRemote’ settings.  After setting the handler section to “<handlers accessPolicy=”Read, Script” />” the WSUS began functioning properly again.

I’m not a total gluten for the GUI, but it would be nice to know where it’s purview ended and the text based editing began (maybe an embedded link in the GUI?).  It could also be that I’m not quite familiar enough with it as well since I’m constantly having to switch between the 6 and 7 interfaces.

All for Naught

We’re going to be getting some very nice business desktops at work which will have quite a bit more CPU power and six (!) times the memory of our current systems.  This of course means that it will now take a little bit longer for my PC to be brought to it’s knees by the Java memory leaks that plague every web management app that I use.

SharePoint upgrade with a side of Metabase

After upgrading from SharePoint 2 to 3 our content came up, but no changes could be made and when trying to sign on (via the “Sign In” link) I was getting an error of “Server Application Unavailable” and an event 1062 on the server with the text:

It is not possible to run two different versions of ASP.NET in the same IIS process. Please use the IIS Administration Tool to reconfigure your server to run the application in a separate process.

What was aggravating on this count was that everything looked to be ASP ‘2’ (2.0.50727), but while digging I discovered that the ‘images’ and ‘inc’ virtual directories under ‘_layouts’ were set to ‘1.1’ (v1.1.4322).  The ‘inc’ path didn’t even exist and after creating it, it stuck to the ASP.net setting of 2.  The ‘images’ virtual directory was a different story as it kept reverting back to 1.1.  I finally recalled from a certification test that if nothing else the metabase.xml file for IIS contains all the settings for the web server and it can be edited by hand.  After looking into the file I discovered that the ‘images’ virtual directory had two entries, one with 2 and one with 1.1.  I deleted the 1.1 and the settings stuck to 2 when IIS was cycled; but unfortunately the error persisted.

It turned out that, even though it couldn’t be changed in the GUI, the ‘_layouts’ directory was set to 1.1.  I manually changed it in the metabase.xml file by copying the settings over from the ‘inc’ section and after cycling IIS the sign-in function worked and the error was gone!

Now to fix all the permissions on our custom web parts that got copied by the upgrade process and were set to the default folder permissions.

Bandwidth Issues Are Odd

A couple of days after I had updated a series of products within the McAfee EPO, I started getting complaints from users about slow access times over the WAN.  After running a technically intensive test (ping) I determined that their complaints were well founded.  In an earlier time I would hop on the router and do who knows what to find the offending party, but I’ve been spoiled these last couple of years by having inaccessible (by me) outsourced routers with our MPLS setup.  Not knowing what was causing the issue I tried toggling some Internet services, investigated file shares, e-mail usage, etc. before taking a ‘what the heck approach’ and stopped the EPO Server service.  The instant I stopped it, the bandwidth issue cleared up.  Started it up, and it comes back.

Thinking that the issue lied with the EPO program itself, I figured the best approach would be to try and upgrade myself out of this issue by moving from EPO 4.0 to EPO 4.5.  This was an event all to it’s own and required a bit of work to get past a database upgrade issue.  After I was done the system came back up and…same issue, the WAN pipe gets completely clogged (apart from our class of service specs of course).  I tried following some bandwidth minimization strategies put forward by McAfee but they weren’t really a good fit for the issue we were having.  I wasn’t getting anywhere with the logs in trying to determine what the huge chunk of data was that being sent into the server, so I fired up network monitor on the off chance that some XML file was being sent in clear text and that it would allow me to determine what the data was.

When I got into the captured data I began scanning some packets, and while none of them were plain text, I did notice that there was a huge disparity in which machines were communicating with the server.  It was so large that it appeared that two PCs, one at each of our remote locations were the sole users of the servers over that brief time.  These PCs were also communicating over port 8085 which is the agent communication port for the EPO server.  I opened the services on the trouble units, stopped the McAfee Framework service and the bandwidth issue cleared up immediately.  I started the services back up and although it took a variable amount of time the bandwidth issue would spring back up.

I’m going to try and redo the agents on the affected system to see if I can clear this issue up…..

UPDATE: Forcing a reinstall of the agent through EPO cleared the issue up on the affected systems.

UPDATE 2: Not so fast!  It appears that for whatever reason my two problem PCs were not applying the second patch for McAfee VirusScan 8.7.  If I had to guess they were constantly trying to download the patch, leading to my bandwidth issue.  The problem now seems permanently cleared up after manually applying the patch to the systems.  The misdiagnosis from the earlier update was caused by a very long lag time from when the agent was installed to when it checked in with the EPO.