These points are based off of the instructions posted here. I did not write that procedure and do not claim to be any sort of expert on DesignJet repair (which will be apparent in a moment). I also got the HP service manual from here (should be a PDF link).
Many years ago I started into the IT business as a hardware repair tech. Part of the duties of this position included repairing HP LaserJet II and III (yes, that long ago) so I wasn’t afraid to tackle this repair job. However, I should note that once I got the 450C halfway disassembled I realized that I didn’t have a ‘spare’ waiting for me at the office if I goofed up along the way so there wasn’t any margin for error. I will note now that these are expensive machines (unlike the now nearly disposable laser printers) and if you feel uncomfortable repairing it you’ll be better off calling someone in!
Anyway, I depend on the printer I am repairing for network diagrams, but unfortunately the plotter doesn’t fall under the purview of the same cost center that employs me so I couldn’t command anybody to have it repaired. If the cost center in question wanted to leave it unrepaired for years that was entirely up to them. At this moment however I am working on some rather involved network architecture plans and really needed the DesignJet to be up, so I took it upon myself to fix it.
As a note, as I discovered later that our DesignJet 450C is the ‘E’ sized version which uses a belt with part number C4706-60082. I had initially ordered the ‘D’ sized belt by mistake (part number C4705-60082). I acquired my new belt from our sales rep Judy Nerone over at Microage.
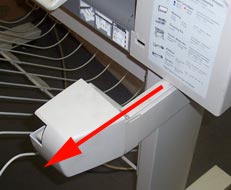
Before beginning work I unplugged the data and power cables:
Next I removed the cover by first popping out the right most tab and sliding the cover to the left in order to clear the other tabs:
(Old plastic alert: these are old systems and the plastics, which were of the brittle variety to begin with, are very prone to breaking. Be as careful as you can (most of the steps that involve plastics usually require some decent force) and have some strong glue on hand).
Remove the power button.
Remove the roll feed supports (if necessary) by removing the single torx 20 screw from both sides and sliding the arms out.
(Note: I had to go down to Home Depot to pick up the torx 20. Ido havea torx 15 leftover from my Compaq days).
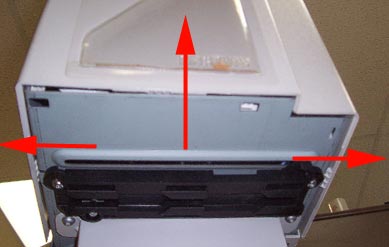
Remove the right cover gently as the control panel is attached to it (the left one is less of worry and comes off the same way). I really had to force the front tab but I was able to remove it without any tools.
The procedure I am referencing says to remove the control panel and leave the cable attached, however I opted to lift up the retaining tab on the control panel cable and disconnect it from the unit. The reason being that I wanted to minimize the cables contact with the sharp medal of the frame. If you do it like this, when reassembling the plotter make sure to reattach the cable before reattaching the spittoon since that will maximize the working area.
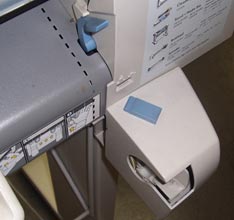
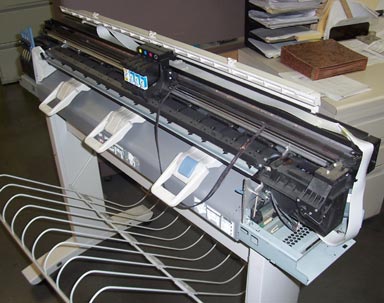
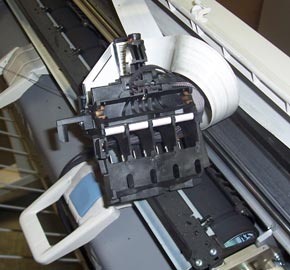
What it looks like so far. Note the poor condition of the belt which was obviously suffering from some severe dry rot. In this picture I’ve also loosened the white trailing ribbon from some it’s clips.
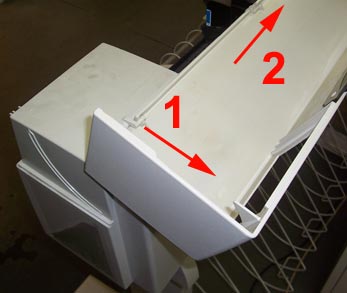
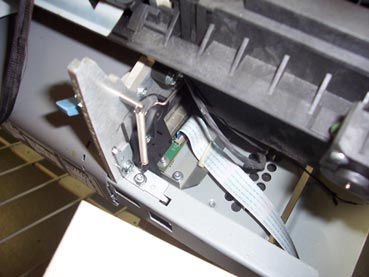
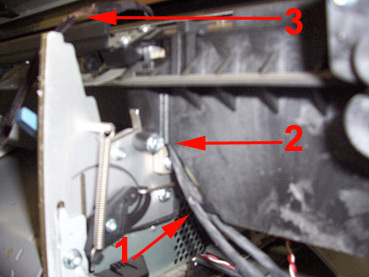
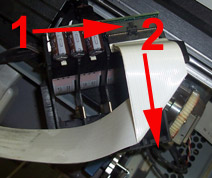
Next we have to remove the spittoon. Note the cables attached to the spittoon (#1). The screw which mounts the spitton to the frame is #2. #3 shows the cutter, when reattaching the spittoon make sure the cutter is in the same place.
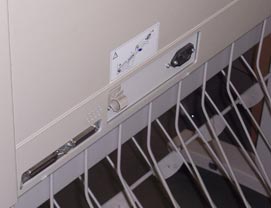
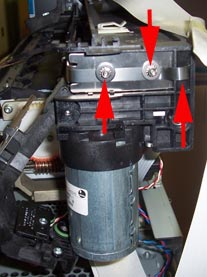
Next remove the encoder strip. Take special care with this part as it tells the carriage assembly where it is at. There are two (I believe 1/4″) nuts on the right (pictured) and a torx screw on the left. Both mounting locations feature holes stamped through delicate medal. Although it did not happen to me (fortunately), I can see where it would be real easy to rip this; on the right side especially. After undoing the nuts on the right, push (hard) on the front part of the medal bracket that it is mounted to(to the left) and there should be enough slack in the strip to disconnect it. Note the third arrow on the right, take special note of how the end of the strip is supposed to mount when reassembling. I’ll also point out that I’ve removed the trailing white data ribbon from its clips and put it around the back right corner of the plotter.
The bracket that held the encoding strip on the right side is then removed by removing one torx screw.
The cutting arm is then removed.
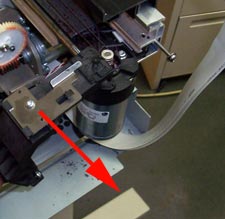
After removing the inks(and taping paper over the heads) I then removed the carriage assembly. At this point the defective belt can be removed from the carriage assembly
Although not required, I found the trailing ribbon cable much easier to disconnect from the carriage assembly after removing it off the rails. I was only able to do this because the belt was so shredded that it wasn’t even connected to the pulley or motor; otherwise you’d want to disconnect it from the carriage assembly before removing the carriage assembly to remove the belt. (I’ll note as well that I cleaned ink off of everything).
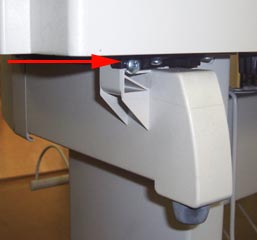
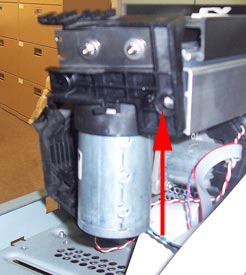
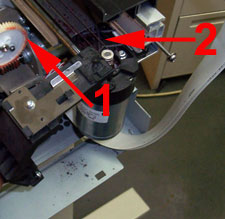
To remove the belt push the motor (#1, on the right side) in towards the left. Where #2 is you should see the spring you’ll be pushing in against.
At this point the printer is disassembled as far as it’s going to go and the new belt just has to be added (put on carriage assembly, then pulley, then motor) and the unit reassembled. Note though that I had to air hose out the unit since it was covered with shredded belt, and I had to scrape ink out the belt grooves on the motor and (especially) the pulley. In fact I had to remove the pulley on the left side (sorry, no pics) by pushing on a release clip that is beneath it under the frame. The pulley assembly consists of the wheel, axle, and a washer.
(Update 2/9/2016: I forgot to mention that this article is old enough that I actually had this happen to me again. I have some nicer photos that I keep meaning to post; it’s on the list. I figured I’d also mention that I have to keep an old 32bit server around since it is the only one with the original HP driver that lets me compile the job in memory on the PC, since even at it’s max, the printer memory cannot handle a lot of jobs. I’m still surprised that this gets as much traffic as it does since so many moderately newer plotters can be had for cheap on EBay, if you’re fortunate enough to be near someone who is selling one).
Thanks! This was very helpful and now my 450C is back up and running!
thanks!!!!! it´s really helpful and it´s take less than an hour to do all this
Another big thank you! Very clear and to the point – the HP repair manual takes alonger more obtuse route. Great photos! I just have to puzzle out why the paper bail drive doesn’t work now…..
Thank You !!
from Italy, near Venice:
Grazie Mille,
nuova vita al mio plotter :-)))
Ciao
I bought a secondhand 450C on Monday, got it home, turned it on and the belt shredded. The blood drained from me as I thought how I had just wasted my money. However I googled the issue, found your page and then ordered the belt. It arrived today and in an hour I had followd your instructions and fitted the new belt. Have just finished a test print and it came out perfectly. Many Thanks for the information.
Don’t worry, when you go to buy inks for that thing, the blood will re-drain 😉
Bonjour de France
Et merci
very helpful, thanks so much for posting. one note, re: encoder strip, nuts are actually 5mm, but 7/32 will also do (on our 430c anyway). also if you’re a bit of an idiot like me and forget to put the cutting head back on before you reinstall the encoder strip. no need to re-remove the strip. the cutting head just snaps on to the rod with light pressure.
cheers mates.
Hi Steve, thanks very much, it was clear, concise and well written.
I was in a similar position to you, my 450C hadn’t been used for over 6 years, the belt had rotted onto the pulleys, then when powered up – well you can imagine!
Anyway, it’s cleaned down, belt replaced, new ink cartridges fitted and print alignment tests complete – SWEET.
Again, many thanks,
Stuart
Many, many thanks. Removing the large plastic housings at either end of the plotter is easily the hardest part. A screw driver worked along the lower edge of these lifts them incrementally, a little at a time.
Robert
Great tutorial. Without it, I would have certainly destroyed this old but usefull tracer !
Many thanks for the time you spent for others for this deep maintenance tutorial!
Higher resolution pictures would have been easyer for me to locate and be sure of what to do, so in the future please take this into accound when making tutorials (we aren’t using 56k dialup anymore right ? 😉 )
Thanks again!
I was dreading this chore of replacing the belt, but your instructions were the best! Thank you for posting! What do you mean by making sure the cutter is in the same place when replacing spittoon? I didn’t notice its placement, and it seems to just slide and not have a place where it feels it should sit. I am hooking up plotter now and hope the electronics know where the cutter shoud be–fingers crossed. Thanks again!
If I recall correctly, which I probably do not, I think that I tried putting the cutter on separately and ended up trapping it inside the plastic housing (for the entire plotter) after I had it together. While it was apart it moved fine, but when it was together…not so much.
I was blessed/cursed with a 430. Price was right for a basic, black/grayscale plotter. Ran a test plot after putting fresh ink in, and the belt shredded. All too common I am thinking on machines sitting unused for very long.
Found a reasonable price on a belt, spent about an hour changing. Not a bad job. There is old, brittle plastic on these things, and it is yellow. I am going to soak the main cover in Hydrogen Peroxide, as it will act as a safe bleach and get the yellow out of it.
I will add to this discussion a warning about the retainer for the ribbon cable. I generally prefer to pull the ribbon cables if it gains room, which here it does, BUT: remember the brittle plastic. I don’t know if I did it, or a previous tech did, but the retainer came completely free from the connector on the board. I don’t have the most nimble fingers in the world, and I did manage to get the cable and loose retainer all in the right places at the right time, but is was aggravating. Use a light touch when releasing the retainer. It will make reconnecting the ribbon cable much easier.
Nice writeup, Steven. Thanks for taking the time to document and photograph the procedure. Even though you did it it 2010, it is still valid and helpful.
In your instructions for changing the carriage belt for the HP Designjet 450C plotter you posted the following link for the service manual however when trying to access it I get a message that I do not have permission to access that webpage so is there any way you could e-mail me that manual as I would like to have it for more than just replacing the carriage belt. Thank you very much.
http://www.feedroller.com/Store/Service%20Manual/DESIGNJET%20430,%20450C,%20455CA%20Service%20Manual.pdf
I found a copy on Partsnow.com (http://www.partsnow.com/docs/service-manuals/hp-designjet-430-thru-455-service-manual.pdf) which actually looks better than the one that I recall from feedroller.com. I’m just going to suck it up though and leave a copy on my site as well.
Thank you so much for taking the time to post these instructions.
I’m having a problem…. the print head picks up the cutter and takes it to the left of the printer. They remain stuck together. The print head can’t go “home” and the cutter remains on left. Help!
It looks like this is dependent upon the metal on top of the cutter interacting with the plastic catch on the head carriage. My guess would be that metal on the cutter is bent (mildly, it wouldn’t take much) in such a way that it won’t release from the carriage.
Steven,
Thank you so much for your help. It was the metal piece on top of the cutter that was bent.
Sending tons of good karma your way.
I recently replaced the drive cable on a DesignJet 430 now the print will not work properly. When I turn the unit on the print head goes all the way to the right then returns to the home station on the left but then does a little back and forth movement then I get and error and the start up procedure will not continue and I get all three error lights on. Any suggestions?
Thanks,
If they’re solid the service manual says “An error which the customer could probably solve, like a paper jam, minor cartridge problem etc.
In order to get more information on the error, the CANCEL key must be pressed which will display a Subcode. Use the error codes below to find information on the subcode.”
—
Note that sometimes I’ll hit cancel and it will clear an error and the plotter will print properly(?!?).
I know the issue I constantly run into since I don’t run mine regularly is dry cartridges, and then I try to fix them, yet they still don’t work, so I buy refills, and one in the batch is bad, etc. Other things I’ve run into is a dry, unoiled “crossbar”, dirty sensor on the carriage assembly, a dirty encoding strip, and improperly loaded paper; it really is a sensitive device.
thanks for the instructions. I put a belt on my HP450C 7 years ago using the HP service manual. Your instructions were much easier to follow. This time I remembered to clean out the spittoon so I don’t have to dig the old ink out with a screwdriver every few months. Other than a belt every 7 years, the HP450 is surely a workhorse.
UPDATE: The belt came in today after taking the slow boat from China. Installed it and my plotter is back up and running! Thanks again!
Thank you very much for this instruction, everything went well.
Steven, Thanks for your instructions on the 430. I used this along with the service manual that I purchased with the replacement belt. It took about 1.5 hours of reading and looking but got it done. belt and carriage works great runs smooth. Wondering if you could help some more. Plotter was working fine when belt shredded. Now I have a problem with the paper loading. Looks like the carriage is hitting the paper and tearing it when it starts to measure. i noticed in the manual adjustment of the carriage to paper, I’ve turned the screw clockwise as far as possible but it still hits the paper. I can rock the carriage back and forth a little, pretty sure its installed correctly but the paper load looks odd. Is the paper supposed to be under or over the metal angled bar with little metal star wheels? It looks like it should be under that bar but mine is over when loaded. Haven’t looked in a long time so I don’t remember it’s always loaded paper very easily in the past. Thanks for any help you can offer.
Bobby
Yeah it should go under, may have to readjust the carriage.
Hey. I noticed your blog title, “” does not really reflect the content of your web-site. When creating your blog title, do you think it’s best to write it for Search engine optimisation or for your viewers? This is one thing I’ve been battling with mainly because I want good search rankings but at the same time I want the best quality for my site visitors.
Let me add my thanks to those above. My 430 belt just gave out after nearly 20 years (of intermittent service) so I guess it’s my turn!
Steven,
We replaced the belt. When I turn on the plotter, it makes a short “clunking” sound, which I believe is coming from the print cartridge assembly. The cartridges, data & media error lights are on steady. When I press cancel, the media and align media lights are on. I cleaned the encoder strip and lubricated the carriage slider rod. It will not allow me to perform a carriage axis test, modular test, or anything else. I also can’t enter service mode 1 or 2. Do you have any ideas? Thank you so much for your time.
It will sound too general, but I would guess that something did not get reinstalled correctly. I know that once I get that thing together I sweat bullets that I missed something and that I will have to take it apart again, but it’s happened before.
Steven,
A+ tutorial!! Many thanks for excellent tutorial with visuals. I am using your instructions to change belts on two plotters. (Also, thanks to Chris who posted the size tool needed to remove encoder screws–5 mm.)
Julia
Steve
Just finished repairing my 450C and thanks to your instructions all went well. Thank you for taking the time, it saved the day
Tom Flynn.
So glad I found your instructions! After all these years, still so helpful. I recently found the A0 printer in a thrift shop, and sure, after my first test print the belt shredded. Made exactly the same mistake you first did (ordering the wrong sized belt). The printer is now in working condition again – I just hope I can make it work with my Imac.
All the best from a proud vintage 430 owner from Belgium.